分类 前端技术 下的文章

GRUNT 添加COPY文件任务

npm install grunt-contrib-copy --save-dev
Gruntfile.js 配置文件中增加
module.exports=function(grunt){
    ...
    grunt.initConfig({
        ...
        copy: {
            main: {
                files: [{
                    expand: true,
                    cwd: 'jsCssSrc/js/',
                    src: ['*.min.js'],
                    dest: 'common/js/',
                },{
                    expand: true,
                    cwd: 'jsCssSrc/css/',
                    src: ['*.min.css'],
                    dest: 'common/css/',
                }]
            },
            build: {
                files: [{
                    expand: true,
                    cwd: 'jsCssSrc/coreJs/',
                    src: ['*.min.js'],
                    dest: 'common/coreJs/',
                },{
                    expand: true,
                    cwd: 'jsCssSrc/coreCss/',
                    src: ['*.min.css'],
                    dest: 'common/coreCss/',
                }]
            }
        },
        ...
    })
    
    ...
    grunt.loadNpmTasks('grunt-contrib-copy');
    ...
    
    grunt.registerTask('default',[...'copy:main',...]);
    
    ...
}

然后就可以执行
grunt copy:main
或者
grunt
就会执行default任务项启动 copy:main 任务

思路,加载一个,video 播放器,然后通过 canvas 画布drawImage 方法将video元素 生成图像

如果需要上传图片到后面保存也是可以的,如下是一个我在工作中实际写的代码,仅作为参考:


    //获取视频封面
    function getVideoImage(blobUrl, call) {
        var video = $("#video-screenshot");
        if (video.length<1) {
            video = $('<video style="height: 0; width: 0;" id="video-screenshot">').appendTo("body");
            video[0].addEventListener('loadeddata', function(e) {
                // console.log(e);
                this.width = this.videoWidth;
                this.height = this.videoHeight;
                this.currentTime = this.duration > 10 ? 10 : this.duration/2;
                // this.play();
                // this.pause();
                var _this = this;
                setTimeout(function () {
                    var canvas = document.createElement('canvas');
                    var ctx = canvas.getContext('2d');
                    canvas.width = _this.width;
                    canvas.height = _this.height;
                    ctx.drawImage(_this, 0, 0, canvas.width, canvas.height);
                    var image = {
                        width: _this.width,
                        height: _this.height,
                        currentTime: _this.currentTime,
                        duration: _this.duration
                    };
                    canvas.toBlob(function(blob) {
                        image.blob = blob;
                        image.url = URL.createObjectURL(blob);
                        typeof call == 'function' ? call.call(this, image) : '';
                    });
                }, 300);
            });
        }
        video[0].pause();
        video[0].src = blobUrl;
    }


    //选择封面图
    $("#choose-image").click(function (e) {
        var $this = $(this), image = $("#preview-image")[0], blob = image.blob, filename = image.filename;
        var filenamearr = filename.split('.');
        filenamearr.splice(-1);
        var url = '/upload';
        var formData = new FormData();
        formData.append('filedata', blob, filenamearr.join(',')+'.jpg');
        formData.append("moredata", '其他字段可添加');
        //上传图片
        $this.prop('disabled', true);
        $.ajax({
            url: url,
            type: 'POST',
            data: formData,
            dataType: 'json',
            processData: false,
            contentType: false,
            success: function (res) {
                $this.prop('disabled', false);
                //成功
            },
            error: function (XMLHttpRequest, textStatus, errorThrown) {
                $this.prop('disabled', false);
                console.error('上传封面图出错', textStatus, errorThrown);
            }
        });
    });


    $("#files").change(function (event) {
        if (!event.target.files[0]) return;
        if (event.target.files[0].type.indexOf('video/') != 0) return simpleDialog({msg: '请选择视频文件'});

        //自动获取封面图
        var blobUrl = URL.createObjectURL(event.target.files[0]);
        getVideoImage(blobUrl, function(image) {
            $("#preview-image").attr('src', image.url);
            $("#preview-image")[0].blob = image.blob;
            $("#preview-image")[0].filename = event.target.files[0].name;
            $("#preview-video").show();
        });

    });

HTML:

    <div class="form-group">
        <label class="required">视频文件 <span class="required">*</span></label>
        <input type="file" id="files" class="form-control"/>
        <div class="pre-video" id="preview-video" style="display: none;margin-top: 10px;">
            <image id="preview-image" style="width: 240px; height: 135px; display: inline-block;" />
            <button class="btn btn-default" id="choose-image" type="button" style="vertical-align: top;">选择此封面</button>
        </div>
        <p class="help-block">请上传1920*1080视频</p>
    </div>    
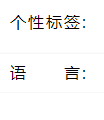
效果:
11.png

代码参考:

HTML:
<div class="panel-title"><span>个性标签</span></div>

CSS:
.panel-title span {
    display: inline-block;
    width: 70px;
    font-weight: 500;
    text-align: justify;
    text-align-last: justify;
}
.panel-title:after {
    content: "\FF1A";
}

设计师工具
px cook 设计图标注软件
蓝湖 设计师协作平台
cuttermant 切图工具

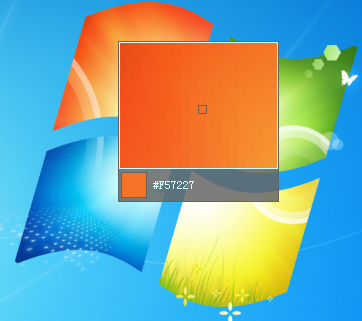
操作非常简单的屏幕取色工具+屏幕尺子+屏幕截图工具。

请输入图片描述

取色
可以直接复制 HTML 颜色值,也可以复制如 color: #ffffff 的 CSS 代码。

尺子
可以直接复制带 PX的大小,也可以复制如 width: 100px 的 CSS 代码。

截图
除了传统的复制到剪贴板,还可以复制为地址:在网页中如果需要上传图片截图,只需复制为地址,然后把本地文件地址复制进行即可上传。

标注
对于视觉稿,可以标注某些模块的功能。还可以创建多个截图区域。

支持多个快捷键
很多取色软件都不支持方向导航,导致鼠标定位到某个点非常累。Screentoolkit支持完美的快捷键。

使用方向键微调!定位点再也不怕抖。

使用F5刷新页面!再也不怕截不到一闪一闪的图标了。

使用 CTRL+C 复制! 使用 CTRL+S 保存!

启动快捷键?Screentoolkit虽然支持这个功能,但必须开机启动这个软件,在软件里面可以设置。

如果不设置开机启动,自然不能做到像qq这样方便的全局快捷键。不过还有一个方案:添加 快捷方式到快速启动或Win7任务条。 点一下就启动了。

软件使用纯C++完成,速度快。

支持多个屏幕
目前很多前端开发人员都有多个显示器,本截图工具是少数的支持多个屏幕的取色器。

本软件只有一个单独的 exe 文件,绿色高效,操作简单。仅适用于 Windows 操作系统。

下载地址: http://work.xuld.net/screentoolkit/

.van-doc-nav::-webkit-scrollbar {
    height: 6px;
    width: 6px;
    background-color: transparent;
}
.van-doc-nav:hover::-webkit-scrollbar-thumb {
    background-color: rgba(69,90,100,.2);
}
.van-doc-nav::-webkit-scrollbar-thumb {
    border-radius: 6px;
    background-color: transparent;
}